Lately I’ve seen some posts about authentication made easy and simple with various packages and how it’s great we doesn’t haven’t to store logins and passwords in our databases anymore due to global availability of social identity providers. It’s true that making simple authentication with of of those providers is simple today. And in Azure App Services it’s even simpler, it really can be done in 5 minutes.
In my current project I just don’t need to acquire a lot of user’s data, what i need is authentication provider (Facebook, Twitter) and user’s id in this external system. I simply need to know that you are you and if you come to my site in a week or month I’ll need to know that you’re still you, I don’t need your name, email, permissions, photos or browser history. That’s why I needed support for multiple providers and I needed to make it as simple as possible.
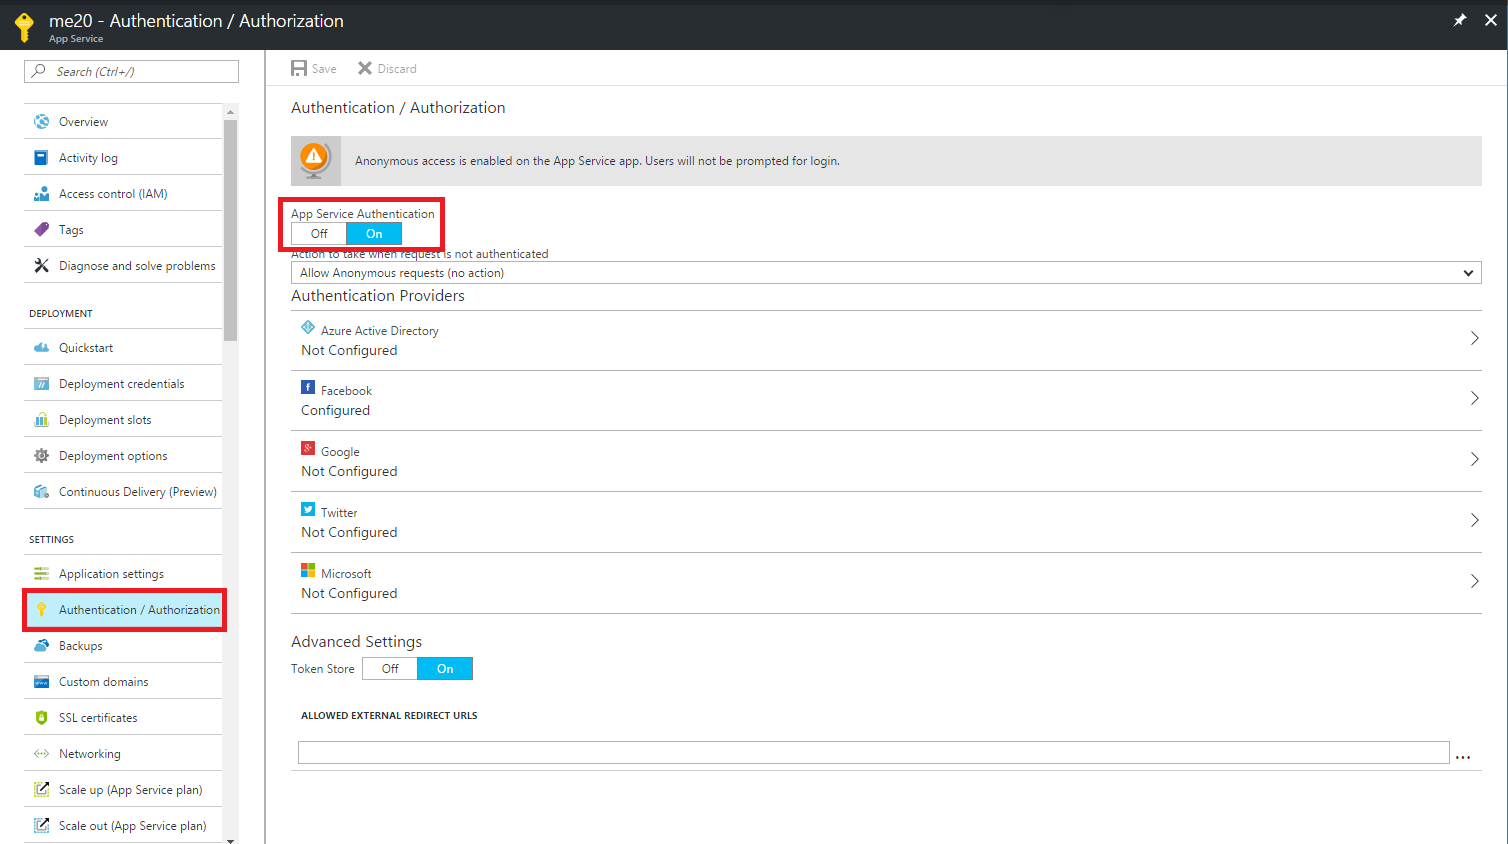
In Azure App Service it’s just one switch in portal.
After turning it on you just need to make decision about allowing anonymous access to your application and if you don’t have unauthenticated users around you’ll need to choose default provider. Next step is configuring provider’s that you’ll want to support.
Every provider is a bit different but similar in some ways and really simple so covering all of it would be waste of time. Just follow instructions that in most cases requires registering your app in provider website (most probably section for developers, at least in case of Twitter or FB) and redirect/callback URL (URL to which user will be redirected after authenticating himself) and after that just pasting API Key and Secret into Azure Portal.
After doing that you can redirect your user to yourappdomain.com/.auth/login/[provider] where provider is ‘facebook’, ‘twitter’, ‘aad’, ‘microsoftaccount’ or ‘google’. After authenticating user will be redirected to specified callback URL and it will be possible to access every available information about him in your backend, in C# it would be this static object:
|
1 |
System.Security.Claims.ClaimsPrincipal.Current |
Logged user could also access information about himself in url yourappdomain.com/.auth/me.
Ok then, this was pretty simple but enough for some basic scenarios. But what if you’ll need tokens to for example post tweets on behalf of logged user? First of all application that you’ve registered in provider’s platform needs to ask for consent for using necessary permissions during logging in. Second thing is that, you’ll need to access some tokens.
First step would be turning Token Store to On to actually store acquired tokens somewhere in this case it means in ~/data/.auth/tokens/ folder in your App Service hosting files, they’re being stored in encrypted state. To access those tokens in code you would need to fetch token values from http request’s headers. In C# action method in sample controller it would look like that:
|
1 2 3 4 5 6 7 8 |
public ActionResult Index() { //Twitter example var accessToken = Request.Headers["X-MS-TOKEN-TWITTER-ACCESS-TOKEN"]; var accessTokenSecret = Request.Headers["X-MS-TOKEN-TWITTER-ACCESS-TOKEN-SECRET"]; // Do stuff return View(); } |
Every provider have it’s own set of keys and it’s own header names, and here they are:
Azure Active Directory:
- X-MS-TOKEN-AAD-ID-TOKEN
- X-MS-TOKEN-AAD-ACCESS-TOKEN
- X-MS-TOKEN-AAD-EXPIRES-ON
- X-MS-TOKEN-AAD-REFRESH-TOKEN
Microsoft Account
- X-MS-TOKEN-MICROSOFTACCOUNT-ACCESS-TOKEN
- X-MS-TOKEN-MICROSOFTACCOUNT-EXPIRES-ON
- X-MS-TOKEN-MICROSOFTACCOUNT-AUTHENTICATION-TOKEN
- X-MS-TOKEN-MICROSOFTACCOUNT-REFRESH-TOKEN
- X-MS-TOKEN-FACEBOOK-ACCESS-TOKEN
- X-MS-TOKEN-FACEBOOK-EXPIRES-ON
- X-MS-TOKEN-GOOGLE-ID-TOKEN
- X-MS-TOKEN-GOOGLE-ACCESS-TOKEN
- X-MS-TOKEN-GOOGLE-EXPIRES-ON
- X-MS-TOKEN-GOOGLE-REFRESH-TOKEN
Twitter Token
- X-MS-TOKEN-TWITTER-ACCESS-TOKEN
- X-MS-TOKEN-TWITTER-ACCESS-TOKEN-SECRET
Making basic authentication in Azure App Service is trivial, so if you won’t need anything fancy… you can use it to get it done rapidly.
